Have you stopped using your Facebook account, or thinking of moving away from Facebook?
Then it’s better to either delete or deactivate your Facebook account.
But the question is: how to deactivate a Facebook account? And whether you should delete or deactivate your account?
Don’t worry. We’ve got your back.
In this post, we’ll show you, how to deactivate your Facebook account from your mobile or desktop device following some easy seps.
So ready to dive in? Let’s go.
What Is The Difference Between Deactivating And Deleting a Facebook Account?
When you decide to move on from Facebook, then you have two options: deactivation or deletion of the account. The biggest difference between these two is that deactivation is temporary and deletion is a permanent action of account disabling.
Deactivation simply disables your profile temporarily and allows you to come back whenever you wish to use your Facebook account. It will temporarily hide settings and all information related to your account. But Facebook does not permanently delete any information from their end.
In the future, whenever you want to access your Facebook account, you can follow the reactivation process for your account to resume all the features once again.
Deleting a Facebook account will permanently remove your profile from a Facebook database, and you can no longer access it once they deleted it.
All your profile data, including your Facebook posts, photos, videos, friend lists, will be deleted, and there is no way to retrieve this. Along with your profile, all the pages that only you control will also be deleted as well.
If you want to keep running these Facebook pages, then it’s quite a good choice to give complete pages access to someone else and then go further to delete your Facebook account. After deleting your account, you also can’t sign in for other apps like Instagram, and Spotify, if you have created those accounts using your Facebook profile.
What Will Happen If You Deactivate Your Facebook Account?
As deactivation Facebook account is a temporary option for disabling a profile, here are some things that will happen after implementing it:
- All information related to your account, profile, and content will be hidden, but some information, like messages that you have sent, will still be visible.
- Other people cannot see your timeline or search for you on Facebook.
- You can access your account anytime by using the reactivation option that we’re going to discuss in a later part of this guide.
- Pages that are under your control will automatically get deactivated and if you don’t want to deactivate those pages, then give complete page access to someone else.
After deactivating your Facebook account, you can still use messenger and access it for chatting. People can also search for you and send messages within messenger, and your profile will remain visible in messenger communications.
How to Deactivate Facebook Account From Your Desktop or Laptop Device
We have done all the work for you so that you can smoothly deactivate your account within a few mouse clicks.
If you’re using a desktop or laptop device, then here are the following steps that you have to follow to deactivate your Facebook account.
Step 1. Firstly, log in to the Facebook account that you want to deactivate.
Step 2. In the top right corner, you will see a down triangle icon. Click on this icon and then select the setting & privacy option from the drop-down.
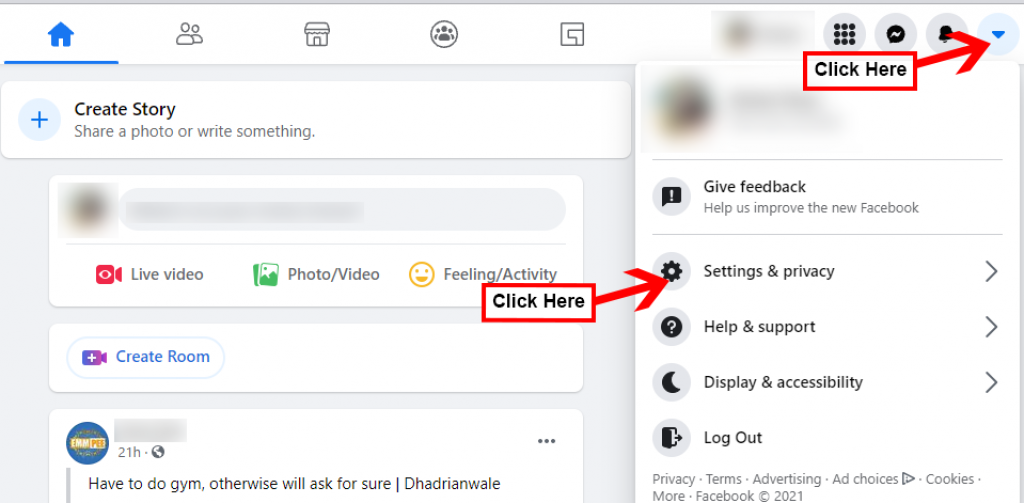
Step 3. Now, you will see the various options for the settings & privacy box. Select the settings option.
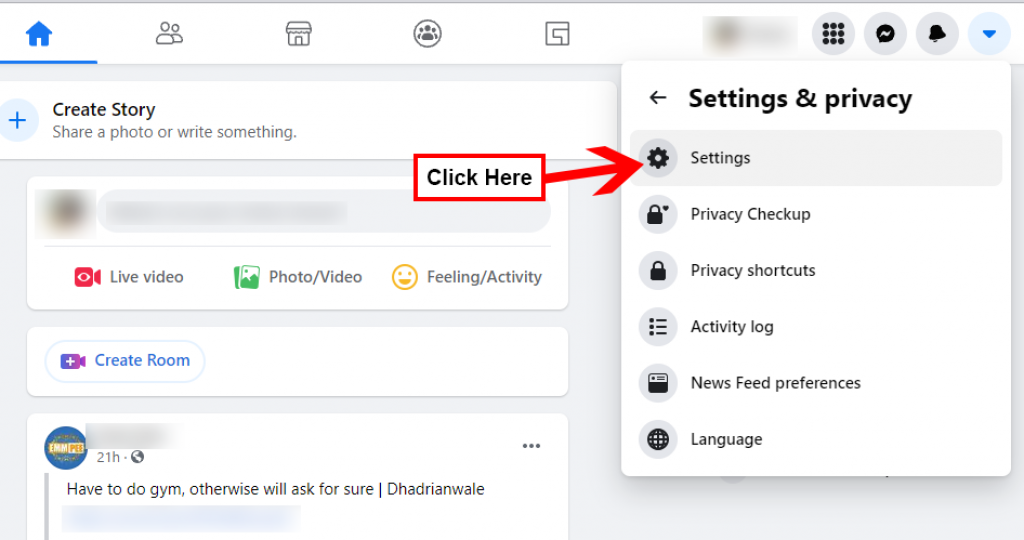
Step 4. It will redirect you to the settings dashboard and select “your Facebook information” option from the left sidebar.
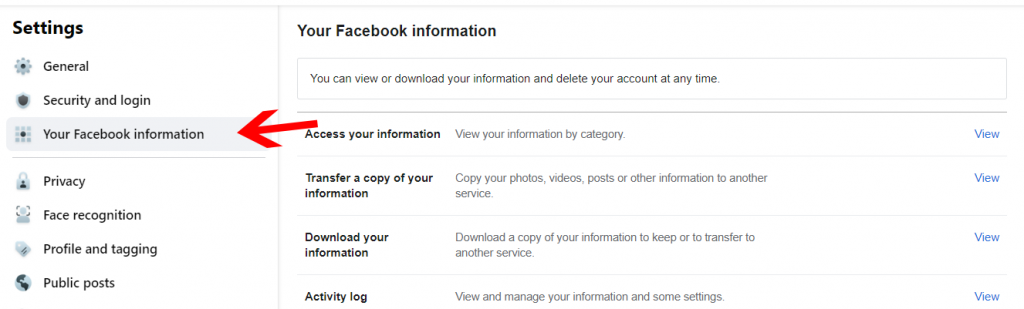
Step 5. Scroll your Facebook information and at the end, you will see the deactivation and deletion option. Click on the view button.
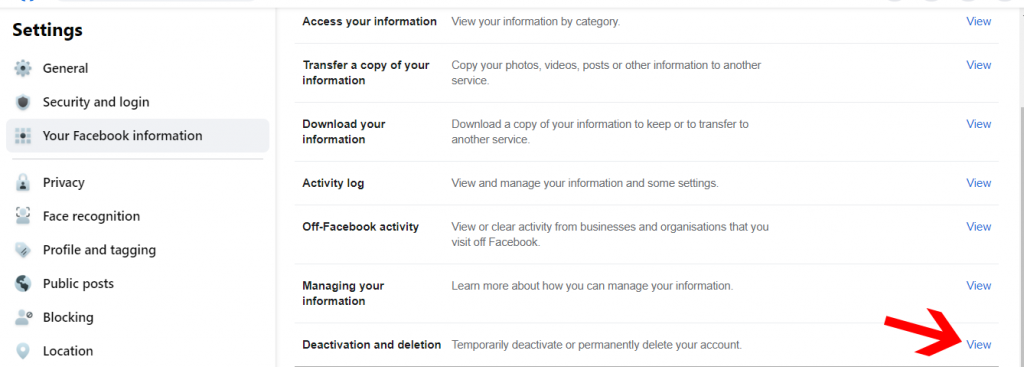
Step 6. Now, another dialogue box will open in front of your eyes, and here you will see two options: deactivation and delete account.
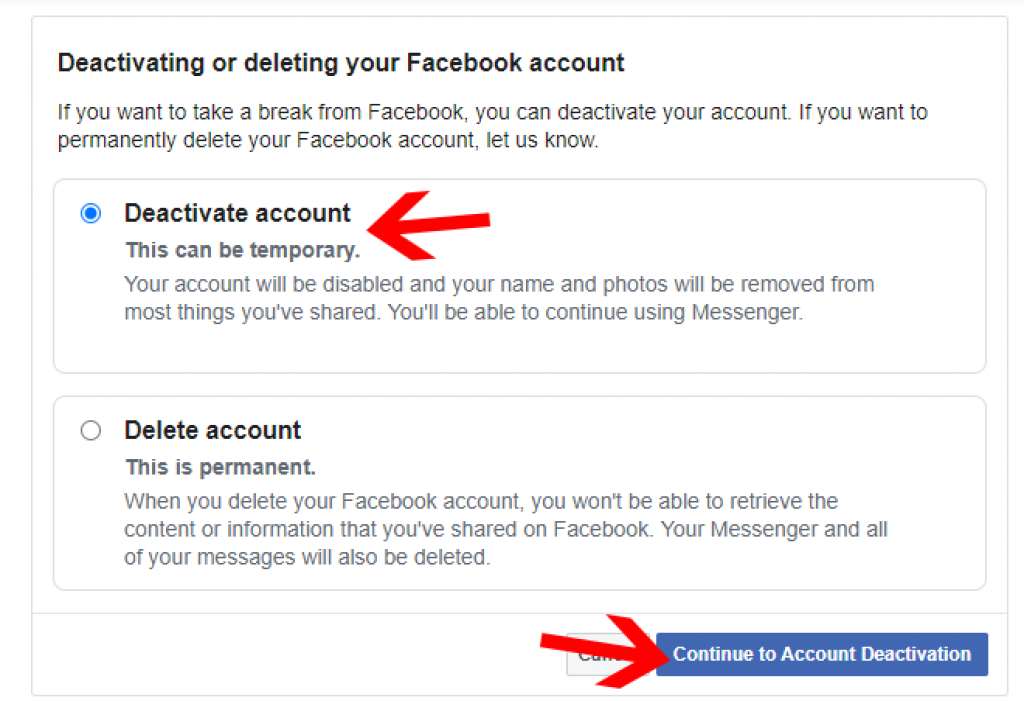
Step 7. To deactivate a Facebook account, select the first option, i.e. deactivate the account and click on “continue to account deactivation”.
Step 8. Now, Facebook will ask a few simple questions and confirm things before you deactivate your account. First, select the reason why you want to close your Facebook account. You can choose reasons from the given options, or if you have any other specific reason, then you can write in the explanation box.

Step 9. After selecting the reason, Facebook may show you some recommendations settings to insist you keep using your account, and for deactivation click on continue.
Step 10. Next, you can check the email opt-out option if you don’t want to receive any email notifications and invitations from your Facebook friends.
Step 11. Select the keep using messenger option if you want to use messenger after deactivating your Facebook account. If you don’t want to use messenger as well as don’t select this option.
Step 12. Now, you’re good to go and select the deactivate option to temporarily disable your Facebook account.
How to Deactivate Facebook Account From Your Mobile Device (Android or iOS)
The steps for deactivating Facebook account from mobile devices are not similar to desktop or laptop devices.
If you want to know how to deactivate Facebook account from a mobile device, then follow the steps below one by one.
Step 1. Log into the Facebook mobile application and click on the three bars at the top right corner of the dashboard.
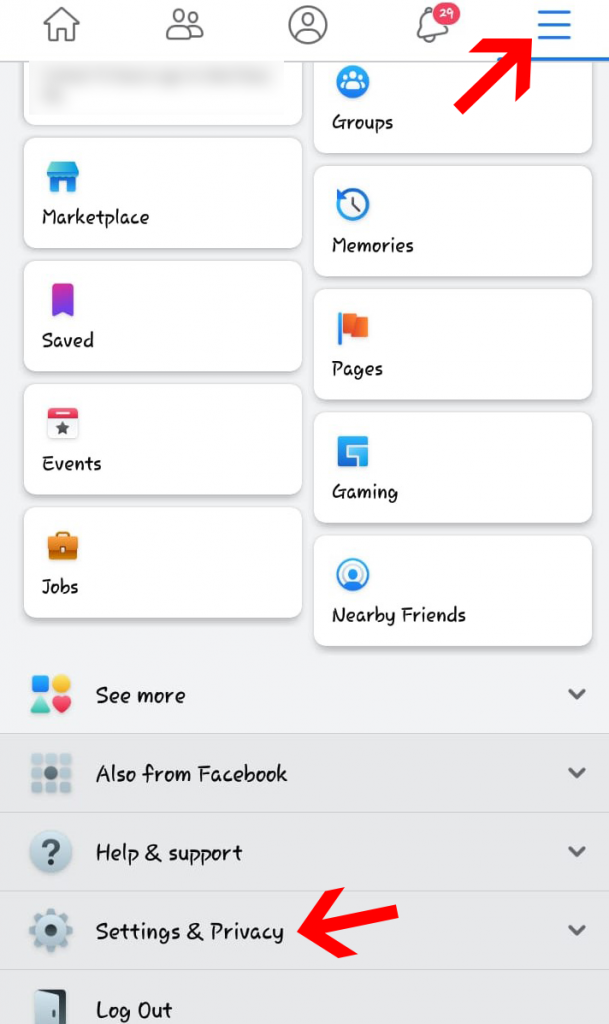
Step 2. Scroll down the page and select the settings & privacy option.
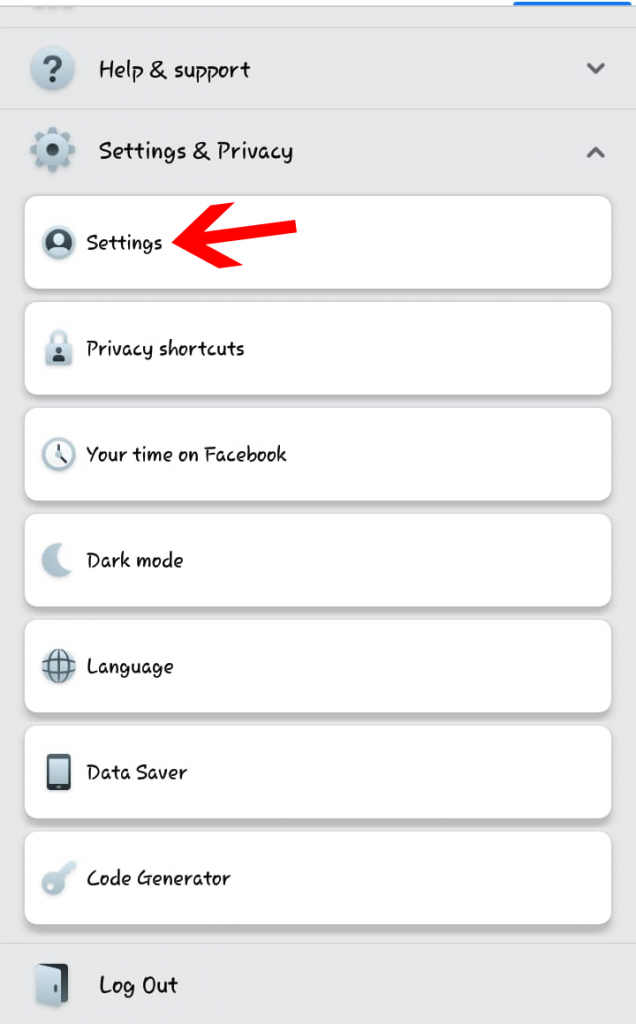
Step 3. Now you will see the settings & privacy drop-down menu will open and select the “settings” option from the menu.
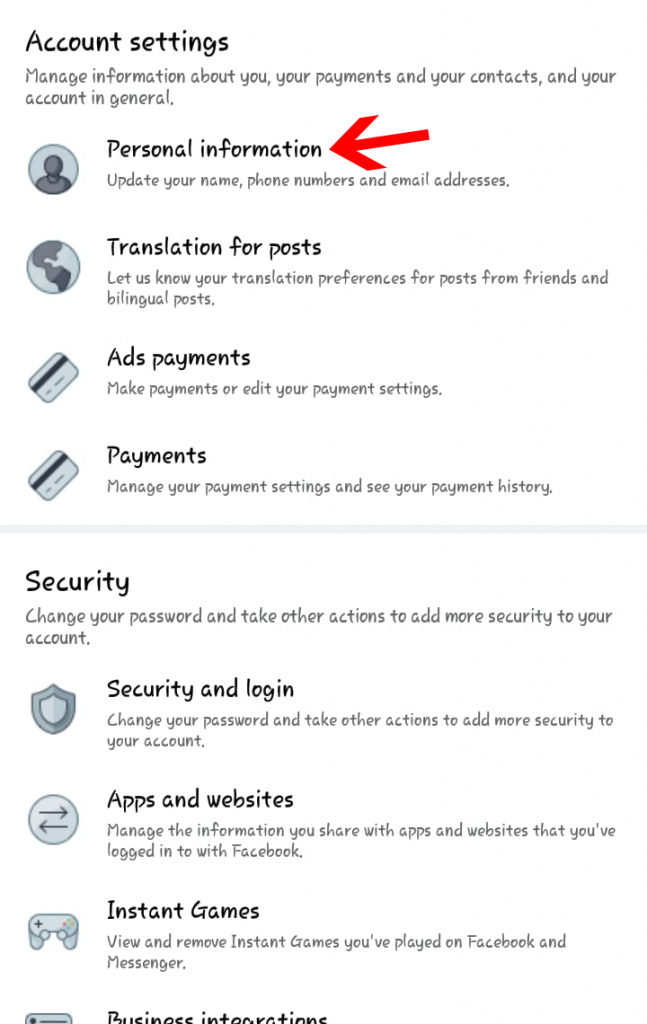
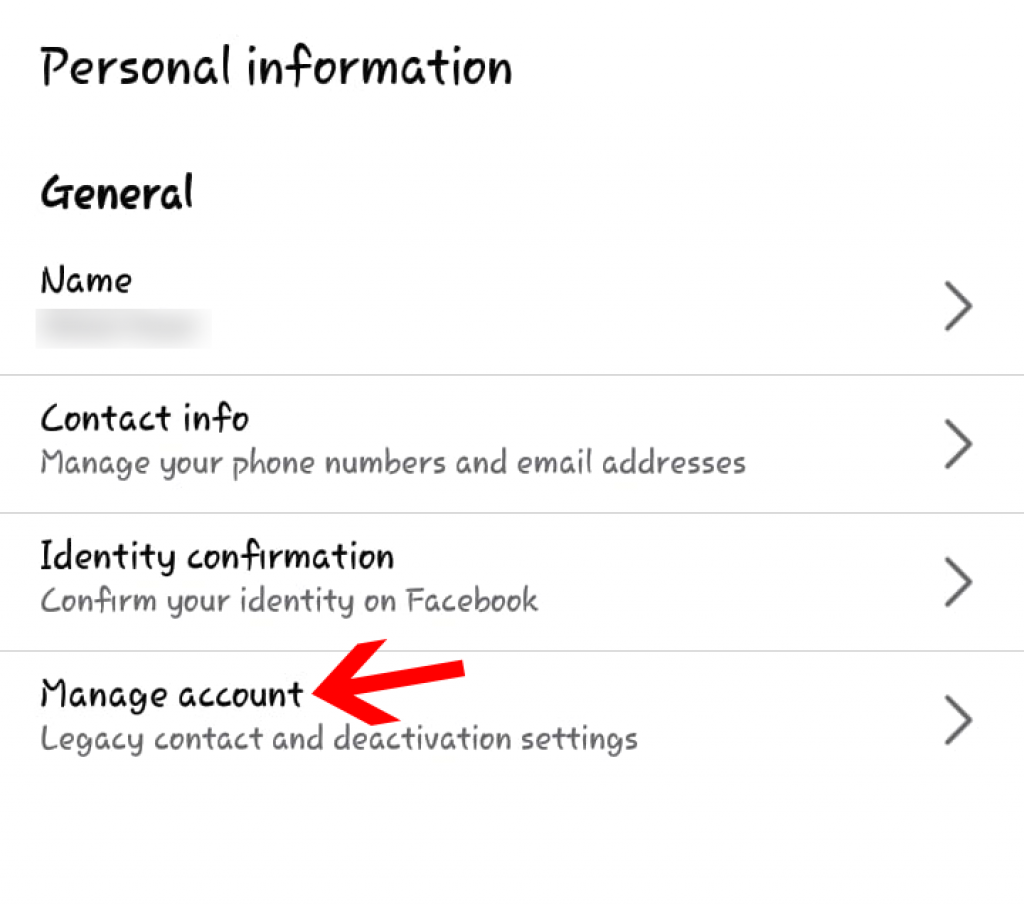
Step 4. Under the settings tab, select the personal information option.
Step 5. Now, look at the end and select the manage account option, which is probably the last option.
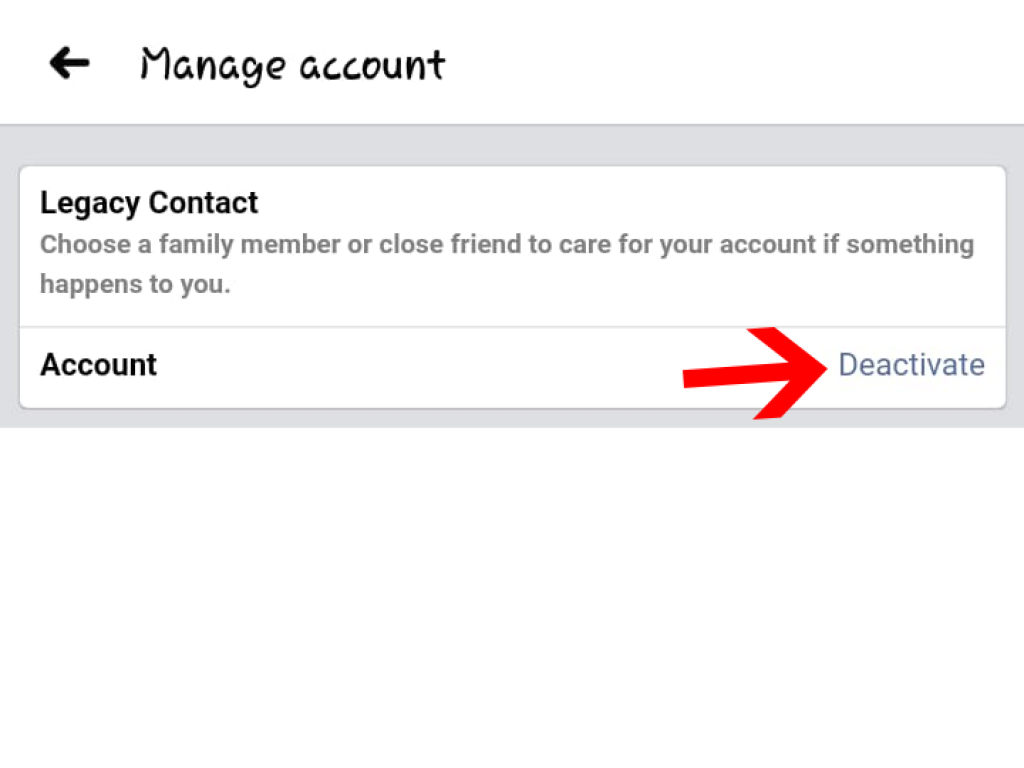
Step 6. It will redirect you to a new page, and here click on the deactivate option.
Step 7. Another dialogue box will appear in front of your eyes, and here you have to give a reason for why you’re deactivating your Facebook account.
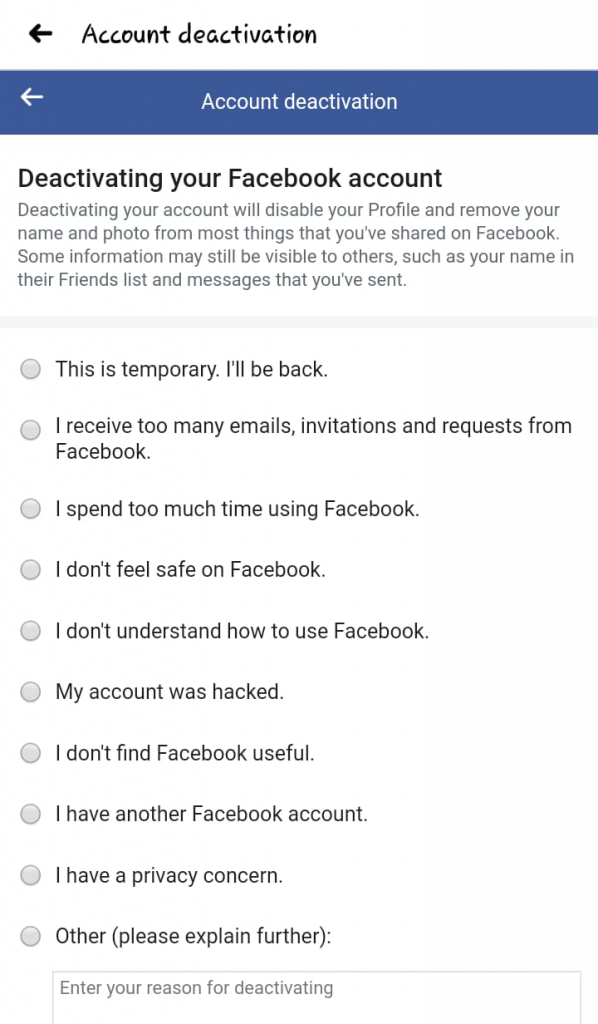
Step 8. After selecting the reason, click on the continue option.
Step 9. Facebook may suggest you few settings based on your reason for leaving so that you will not deactivate your account. If you still want to deactivate, then click on the continue option once again.
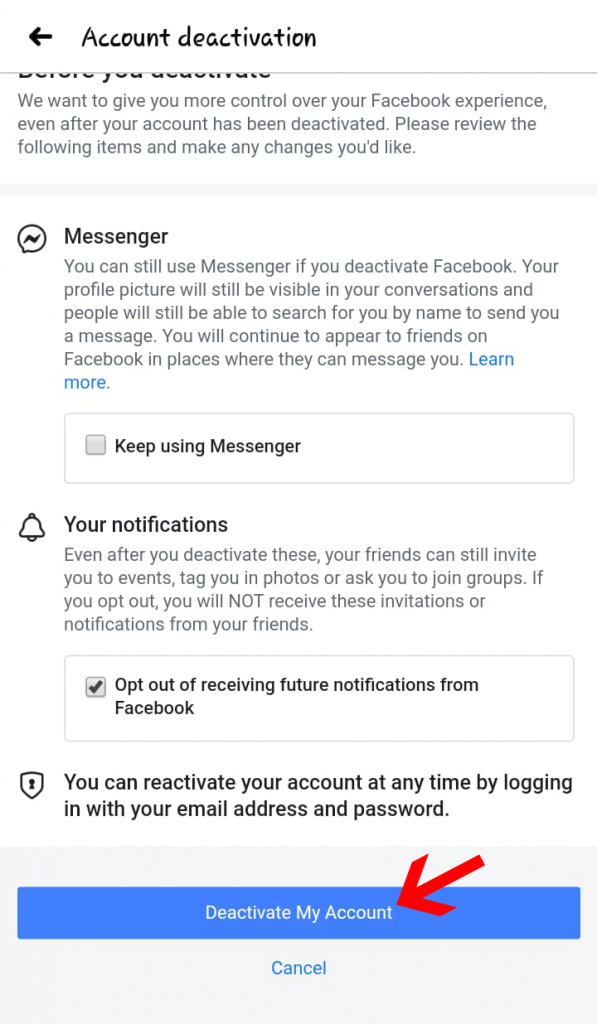
Step 10. On the next page, Facebook will ask you whether or not you want to use messenger after deactivating your Facebook account. If you want to use it, then check the box beside the keep using messenger option. Otherwise, remain that box unchecked.
Step 11. Next, Facebook will take your consent for email notifications. If you don’t want to receive an email notification from Facebook, then check the box to opt out of receiving future notifications. And after deactivation, you will no longer receive any suggestions, notifications, or invitations by email from your Facebook account.
Step 12. After selecting these options, click on deactivate my account.
How to Reactivate Your Facebook Account?
In the future, if you want to use your Facebook account again, then you easily do it by reactivating your old Facebook account.
Anytime you can resume your account, and for this, you just need to simply login back to your Facebook account with your old account credentials. You must have access to the registered email id or mobile number to complete the Facebook account reactivation process.
After successfully following the reactivation process, you can continue to enjoy using Facebook.
How Long Can You Temporarily Deactivate Your Facebook Account?
Your Facebook account will remain temporarily deactivated until you choose to delete it permanently or reactivate it again.
Otherwise, there is no time frame for temporary deactivation, it just depends upon your requirements. And you can temporarily deactivate your account for how long you want to deactivate it.
Is It Better to Deactivate or Delete Facebook Account?
It depends upon your requirements and for how much time you want to disable your Facebook account. If you just want to shut down Facebook for a short while and you want to continue using Facebook in the future, then you should go with the deactivation of your Facebook account. Because it allows you to reactivate your account wherever you want to use your old Facebook account.
On the other hand, if you have decided never to use your Facebook account again, It’s better to delete your Facebook Account. It will help you to delete all of your personal information from Facebook, and nobody will misuse your Facebook account in your absence.
But before deleting your Facebook account, make sure that you have fully prepared your mind to no longer use Facebook. Because after permanently deleting your Facebook account, there is no way to retrieve your account back.
If you just want to go off from Facebook for a while, the better option would be to deactivate your Facebook account for a while. You can always reactivate your account any you want.
Conclusion
I hope now you’re clear about how to deactivate your Facebook account.
It’s super easy to deactivate your Account. All you have to do is follow the simple steps we’ve explained in this post.
And you can always reactivate your Facebook account anytime you want by just logging into your account